Germinating Mimosa hostilis seeds successfully requires precision, patience, and a clear understanding of the plant’s natural growth cycle. Also known botanically as Mimosa tenuiflora, this resilient tree is native to regions of Brazil, Mexico, and parts of Central America, where it thrives in warm, semi-arid climates. Proper germination techniques significantly improve sprouting rates and ensure strong, healthy seedlings ready for transplanting.
This comprehensive guide explains exactly how to germinate Mimosa hostilis seeds step by step, including seed preparation, scarification, soaking methods, soil selection, watering schedules, temperature control, and early seedling care.
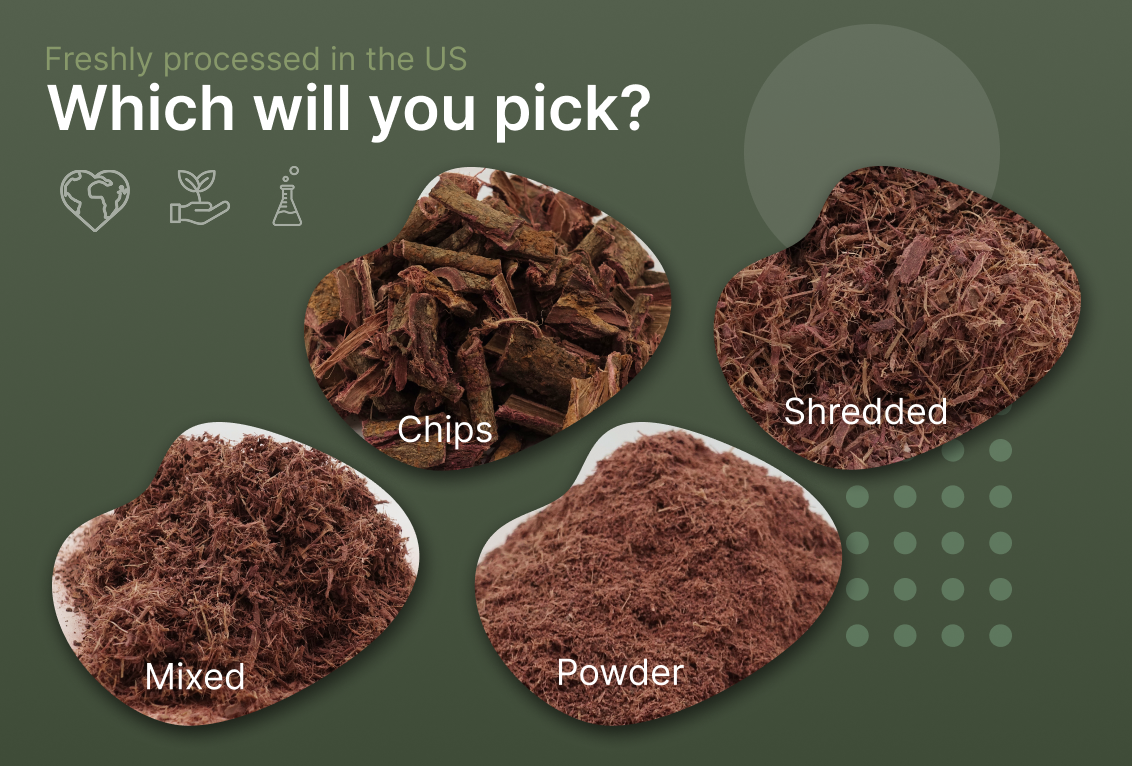
What Is the Best Way to Germinate Mimosa Hostilis Seeds?
The most effective method for germinating Mimosa hostilis seeds involves three essential stages: scarification, soaking, and controlled warm planting conditions. Because the seeds have a hard outer shell, natural germination in the wild often occurs after exposure to heat or abrasion. Replicating this process artificially increases success rates dramatically.
Successful germination depends on breaking seed dormancy without damaging the embryo inside. Once prepared correctly, seeds typically sprout within 5 to 14 days under optimal conditions.
Understanding Mimosa Hostilis Seed Dormancy
Mimosa hostilis seeds possess a tough, water-resistant coating designed to protect the seed during harsh environmental conditions. This outer shell prevents premature sprouting and ensures the seed only germinates when conditions are favorable.
Without proper scarification, water cannot penetrate the seed coat efficiently. As a result, untreated seeds may remain dormant for weeks or even months. Breaking this dormancy is the critical first step in achieving fast and uniform germination.
Step 1: Scarifying Mimosa Hostilis Seeds Properly
Scarification is the process of weakening or thinning the hard outer shell to allow water absorption.
There are two reliable scarification methods:
Hot Water Scarification Method
Bring water to a near boil and remove it from heat before adding the seeds. The water should be very hot but not actively boiling when seeds are introduced. Allow the seeds to soak in this hot water for 24 hours. During this period, viable seeds will swell as they absorb moisture.
Seeds that do not swell may require a second treatment or slight mechanical scarification.
Mechanical Scarification Method
Lightly rub each seed against fine sandpaper or nick the outer shell gently with a blade. The goal is to thin the coat without cutting into the inner embryo. Once scarified, soak the seeds in warm water for 12 to 24 hours before planting.
Proper scarification dramatically increases germination rates and reduces waiting time.
Step 2: Soaking for Maximum Germination Success
After scarification, soaking ensures the seed is fully hydrated before planting.
Place the seeds in warm water at room temperature for up to 24 hours. Swollen seeds indicate readiness for planting. Discard seeds that remain hard and unchanged, as they may be non-viable.
Hydration activates the embryo inside the seed and signals the beginning of the germination process.
Step 3: Choosing the Right Soil for Mimosa Hostilis Germination
Mimosa hostilis prefers well-draining, sandy soil similar to its native habitat. The ideal germination medium should allow moisture retention without becoming waterlogged.
A high-quality mix includes:
-
Sandy soil base
-
Perlite or coarse sand for drainage
-
Organic compost in moderate amounts
The pH level should remain slightly acidic to neutral, ideally between 6.0 and 7.5.
Avoid heavy clay soils, as poor drainage can cause seed rot before sprouting occurs.
Step 4: Planting Depth and Spacing
Plant each seed approximately 1 to 2 centimeters deep. Cover lightly with soil and gently firm the surface.
Spacing matters even at early stages. If planting in trays, ensure each seed has adequate room for root development. Overcrowding increases the risk of fungal growth and weak seedlings.
After planting, lightly water the soil to settle it around the seeds without oversaturating.
Step 5: Ideal Temperature and Humidity Conditions
Temperature control plays a decisive role in germination success.
Mimosa hostilis seeds germinate best in warm conditions between 24°C and 30°C (75°F to 86°F). Maintaining consistent warmth accelerates sprouting.
If growing indoors, use a heat mat to stabilize soil temperature. Outdoors, plant during warm seasons when nighttime temperatures do not drop significantly.
Humidity should remain moderate. Excessive moisture encourages fungal diseases, while overly dry conditions halt germination.
How Long Do Mimosa Hostilis Seeds Take to Germinate?
Under optimal conditions, Mimosa hostilis seeds typically germinate within 5 to 14 days. Some may sprout sooner if scarification and soaking were performed correctly.
Environmental factors such as temperature fluctuations, soil moisture imbalance, or insufficient scarification may delay sprouting.
Patience during this stage ensures healthy, vigorous seedlings rather than weak, stressed growth.
Watering Schedule During Germination
Watering must remain consistent but controlled.
The soil should stay lightly moist, never soaked. Overwatering deprives seeds of oxygen and leads to rot. Underwatering interrupts the germination process.
Using a spray bottle or gentle watering can helps maintain surface moisture without disturbing the seed’s position.
Proper drainage remains critical throughout the process.
Recognizing Healthy Mimosa Hostilis Seedlings
Healthy seedlings emerge with small paired leaves and a thin upright stem. Early growth is rapid when conditions are ideal.
At this stage, provide:
-
Indirect bright sunlight
-
Protection from strong winds
-
Moderate watering
Avoid direct intense sunlight during the first weeks, as young plants are sensitive to heat stress.
As the seedling matures, it develops the characteristic feathery leaves associated with Mimosa hostilis.
Transplanting Mimosa Hostilis Seedlings
Once seedlings reach approximately 10 to 15 centimeters in height and display strong root development, they can be transplanted into larger pots or outdoor soil.
Choose a sunny location with well-draining soil. Mimosa hostilis thrives in full sun once established.
During transplanting, handle roots gently to prevent shock. Water thoroughly after relocation but avoid saturating the soil.
Gradual acclimatization to direct sunlight strengthens the plant and reduces stress.
Common Germination Problems and Solutions
Slow or failed germination often results from insufficient scarification. Repeating the hot water treatment can improve success.
Fungal growth indicates excessive moisture. Improve drainage and reduce watering frequency immediately.
If seedlings appear weak or elongated, increase light exposure gradually.
Yellowing leaves may signal poor drainage or nutrient imbalance. Adjust soil composition and watering practices accordingly.
Addressing these issues early ensures robust long-term growth.
How to Increase Mimosa Hostilis Germination Rates
Maximizing germination rates requires attention to detail.
Always use fresh, viable seeds stored in cool, dry conditions. Maintain consistent warmth during the entire germination period. Avoid temperature fluctuations, especially at night.
Ensure proper soil aeration and never allow standing water in trays or pots.
By combining precise scarification, proper soaking, optimal soil conditions, and controlled temperature, germination rates can exceed 80% under ideal circumstances.
Long-Term Growth Expectations
Mimosa hostilis is a fast-growing tree under favorable conditions. In warm climates similar to its native regions in Brazil, it can grow several feet per year.
The tree develops a deep root system, making early transplanting into sufficiently large containers essential for container cultivation.
Once mature, Mimosa hostilis becomes drought-tolerant and highly resilient, requiring minimal maintenance beyond occasional pruning.
Achieving Reliable Mimosa Hostilis Seed Germination
Successfully germinating Mimosa hostilis seeds requires structured preparation, correct scarification techniques, controlled warmth, and balanced moisture levels. By replicating the plant’s natural environmental triggers, seeds transition from dormancy to active growth quickly and reliably.
Precision in each step—from hot water treatment to soil selection and temperature management—ensures strong seedlings capable of thriving long term. When executed properly, this method delivers consistent results and establishes the foundation for healthy Mimosa hostilis cultivation.
Frequently Asked Questions
1. How long does it take for Mimosa hostilis seeds to germinate?
Mimosa hostilis seeds typically germinate within 5 to 14 days when properly scarified and kept in warm conditions between 24°C and 30°C. Cooler temperatures or insufficient scarification can delay sprouting.
2. Do Mimosa hostilis seeds need scarification before planting?
Yes. The seeds have a hard outer shell that prevents water absorption. Scarification, either through hot water treatment or light sanding, is essential to break dormancy and significantly improve germination rates.
3. What type of soil is best for germinating Mimosa hostilis seeds?
Well-draining sandy soil is ideal. A mix containing sand or perlite with light organic compost works best. Heavy clay soil should be avoided because it retains too much moisture and can cause seed rot.
4. How often should I water Mimosa hostilis seeds during germination?
The soil should remain lightly moist but never waterlogged. Gentle misting or light watering is recommended. Overwatering can deprive seeds of oxygen and increase the risk of fungal problems.
5. Can Mimosa hostilis be grown indoors successfully?
Yes, Mimosa hostilis can be grown indoors during early stages, especially in cooler climates. Use a heat mat to maintain warm soil temperatures and provide bright indirect sunlight. Once established, the plant thrives best in full sun conditions outdoors.